Before we start the main reason for this Tutorial, we will first of all, introduce to you Google Drive, because if you do not know the storage device which this article is pointing at, I think is like swimming in a river and soap will go into your eyes.
Introduction to Google Drive
Google Drive is an incredibly convenient and easy way to access and share your files. It’s a cloud-based storage system that allows you to store and access your files from any device, anywhere in the world. With Google Drive, you can easily upload, store, and share your documents, photos, videos, and other files with anyone you choose. You can also collaborate with others in real-time, making it a great tool for teams and businesses. Google Drive is secure, reliable, and easy to use, making it a great choice for anyone looking for a simple way to store and share their files.
How to Use Google Drive to Easily Access and Share Your Files
Google Drive is an incredibly useful tool for anyone who needs to store and access files quickly and easily. It’s a cloud-based storage system that allows you to store and share files from anywhere, anytime. With Google Drive, you can access your files from any device with an internet connection, making it easy to share and collaborate with others.
To get started with Google Drive, you’ll need to create a Google account. Once you have an account, you can log in to Google Drive and start uploading your files. You can upload files from your computer, or from other cloud storage services like Dropbox or Box. Once your files are uploaded, you can access them from any device with an internet connection.
Once your files are uploaded, you can organize them into folders and subfolders. This makes it easy to find what you’re looking for, and you can also search for specific files or keywords. You can also share your files with others, either by sending them a link or by giving them permission to view or edit your files. You can read more about Google Drive Here.
Download Google Drive Large and Small Files Using Curl or Wget SSH
Downloading Google Drive files using WGET is an efficient method for retrieving files from your cloud storage. In this blog post, we will explore how to use WGET for an effortless downloading experience from Google Drive.
We’ll begin by exploring the benefits of Wget and its compatibility across various operating systems. Next, we will guide you through setting up sharing permissions in Google Drive to ensure a seamless downloading experience.
Furthermore, you’ll learn how to locate direct download URLs for your files and execute wget commands in the terminal with appropriate flags. Finally, we will share valuable tips on downloading multiple files or large items by compressing them into single archives before uploading them to Google Drive.
By mastering these techniques on how to download Google Drive files using WGET, you can save time and enhance productivity when working with extensive collections of data stored in the cloud.
Understanding Wget and Its Applications
Wget is a free utility software available on Unix-based systems that allows you to retrieve content from web servers through various protocols like HTTP or FTP. It has many useful features, such as downloading multiple files simultaneously or resuming downloads after interruptions, making it an essential tool for beginners and seasoned pros.
Overview of Wget’s Functionality and Supported Protocols
The primary function of Wget is to download files from the internet using different protocols. Some protocols that can be employed with wget include HTTP, HTTPS, FTP, and FTPS. With its ability to work in the background without user intervention, Wget proves highly efficient when managing file transfers.
Benefits of Using Wget for File Retrieval
- Resume interrupted downloads: Wget can automatically resume the process where it left off if your download gets interrupted due to network issues or other reasons.
- Mirror websites: You can use Wget to create local copies of entire websites by recursively downloading all linked pages within a specified domain.
- Schedule downloads: You can schedule automated file retrieval at specific times by integrating with cron jobs (on Unix systems) or Task Scheduler (on Windows).
- No need for browser access: Since it operates via a command line interface (CLI), there’s no requirement for opening a web browser during file transfer operations – ideal when working remotely over SSH connections.
In addition to these benefits, learning how to use Wget effectively can help you download Google Drive files with ease, even when dealing with large files or multiple items at once. This is especially useful for those who have a Google account and need to download files from Google Drive.
Setting Up Google Drive File Sharing Permissions
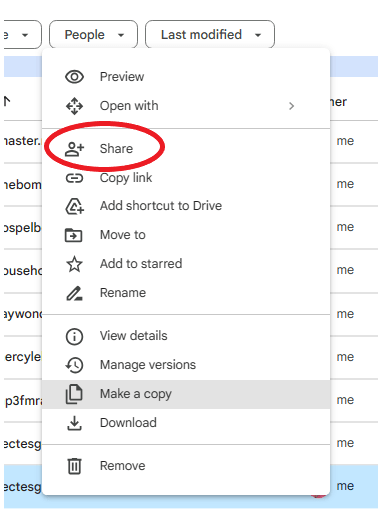
To download files from Google Drive using the wget command, you must first set up sharing permissions correctly. This involves right-clicking on the desired file within your Google Drive account, selecting “Share,” and adjusting permission settings so that anyone with the link can view/download your file(s).
Steps to Configure Sharing Permissions in Google Drive
- Locate the file you want to share in your Google Drive account.
- Choose either “Viewer” or “Editor” for Access Level, depending on whether you want others only to view or edit as well.
- Click on the ‘Done‘ button after making necessary changes accordingly overall.

- Switch to “Anyone with the link” under General access options.
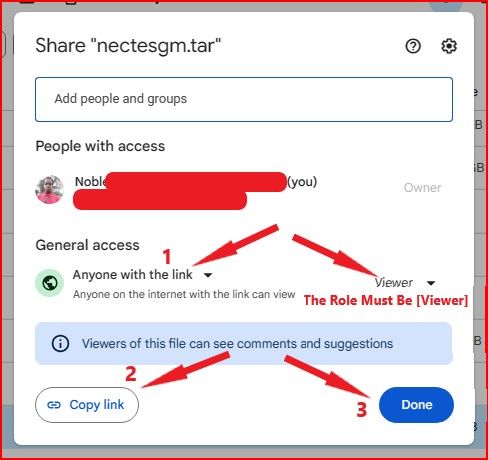
- Choose either “Viewer” or “Editor” for Access Level, depending on whether you want others only to view or edit as well.
- Click on the ‘Done‘ button after making necessary changes accordingly overall.
The Importance of Proper Permission Settings for Successful Downloads
Maintaining proper permission settings is crucial when attempting to download Google Drive files using wget. Incorrectly configured permissions may result in failed downloads or unauthorized access attempts being flagged by security systems. By carefully following these simple steps outlined above, users should be able to successfully retrieve their desired content without any issues arising during such processes overall – ensuring smooth operations all around.
Locating Direct Download URLs in Google Drive
If you want to download Google Drive files using WGET, you need to find the direct download URL first. This is crucial for a successful download. Follow these steps to identify and copy accurate URLs without errors:
- Sign in to your Google Drive account: Navigate to your file(s) in Google Drive within the “My Drive” section.
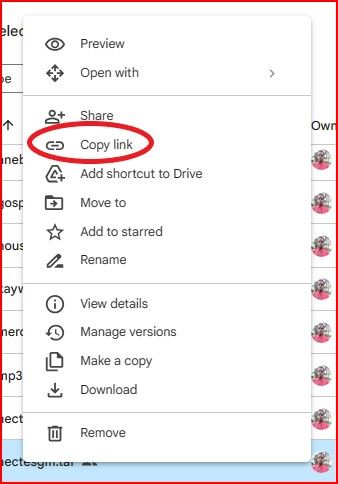
- Right-click and select ‘Copy link’: Click on the respective item listed under ‘My Drive’ and select the ‘Copy link‘ button/icon beside it.
- Save the direct download link: Paste the copied data into a notepad or text editor application for further reference/use later during terminal/command prompt operations.
The direct download link will look similar to: https://drive.google.com/file/d/1aUtQBSPL0-cWQOxEZsVHD-JsU-04b_TS/view?usp=drive_link
Copy the file id from the download URL 1UibyVC_C2hoT_XEw15gPEwPW4yFyJFeOEA , as you will need it later while using the wget command.
You can use the wget command to download Google Drive files now that you have the direct download URL. This is especially useful for downloading large files. Make sure you have wget installed on your system before proceeding.
How to Download Google Drive Files Using WGET
Before continuing, it is important to understand how Google Drive organizes files. Those with less than 100 MB are classified as “small,” while anything over 100 MB is deemed “large”.
To download the file, open your terminal/command prompt and enter the following command:
Downloading small Google Drive Files using WGET (less than 100MB)
To download a small file stored on Google Drive, use the following wget command in your terminal:
wget --no-check-certificate 'https://docs.google.com/uc?export=download&id=FILEID' -O FILENAME
Replace the FILEID with the file id from the download URL. Also, replace FILENAME with the file name you are downloading from Google Drive.
Downloading large Google Drive Files using WGET (over 100MB)
To download a large file stored on Google Drive, use the following wget command in your terminal:
wget --load-cookies /tmp/cookies.txt "https://docs.google.com/uc?export=download&confirm=$(wget --quiet --save-cookies /tmp/cookies.txt --keep-session-cookies --no-check-certificate 'https://docs.google.com/uc?export=download&id=FILEID' -O- | sed -rn 's/.*confirm=([0-9A-Za-z_]+).*/\1\n/p')&id=FILEID" -O FILENAME && rm -rf /tmp/cookies.txt
Replace the FILEID with the file id from the download URL. Also, replace FILENAME with the file name you are downloading from Google Drive.
That’s it! Following these simple steps, you can easily download files from Google Drive using the wget command. Happy downloading.
How to Download Google Drive Files Using CurlWGET Google Chrome Extension
Alternatively, suppose you’re using Google Chrome as your web browser. In that case, an extension called CurlWGET, developed by Sebastian Patraulescu can help you generate any wget download command with a simple click.
CurlWget is a convenient application that can be used when a graphical user interface browser isn’t accessible in certain situations, such as on a unix/linux remote shell. It provides users with a singular command line string, either ‘curl’ or ‘wget’, that can be then copied and pasted into the terminal.
To generate a wget download command using CurlWGET, follow the steps below:
- Head out to the Chrome web store and add the CurlWget extension to your browser:

- Sign in to your Google Drive account: Navigate to your file(s) in Google Drive within the “My Drive” section.
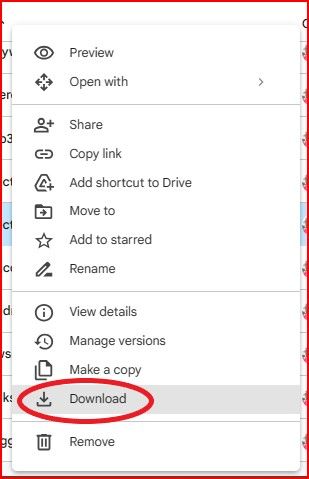
- Right-click and select ‘Download’: Click on the respective item listed under ‘My Drive’ and select the ‘Download’ button/icon beside it. This will start the download process for that file on your computer. (no worries, as we won’t leave the download process to complete).
- Once the download starts, click on the CurlWGET icon pinned in your Google Chrome web browser.
- A pop-up will open from where you can copy the entire wget command line generated by the extension.
- Now you can use the wget or curl command in your terminal.
Downloading Multiple Files or Large Files from Google Drive
When dealing with multiple items simultaneously, especially larger ones, it’s recommended to compress them before uploading them onto the Google Drive platform. This way, users can quickly grab everything at once without needing to go through each entry separately or worrying about potential errors/issues arising due to incomplete/inaccurate data transfers between the server(s)/client-side systems during such processes overall.
Benefits of Compressing Files Before Uploading to Google Drive
- Faster download times for both you and your recipients.
- Better organization of files in your Google Drive account.
- Easier sharing of large files or entire folders using a single link.
- Reduced risk of transfer errors and file corruption during downloads.
Conclusion
Using Wget, downloading files from Google Drive becomes a simple and efficient process. Wget offers flexibility for users of all levels, with the ability to retrieve files in bulk and on multiple operating systems.
Executing successful downloads requires setting up sharing permissions and locating direct download URLs. Additionally, compressing large items before uploading them to Google Drive can save time and storage space when retrieving them with Wget.
If you enjoyed this article, you’d love our web hosting platform even more! Try us out for 45 days, worry-free, and if you’re unhappy, you get your money back!